GitHub Actions opened a new opportunity for developers to create automation. Nothing special, you would say, but actually, it is. When I saw about this for the first time I said: “Finally a CI built-in directly in Github.”. A long-awaited feature. Having git + CI in my favorite service.
Right now it’s still in beta, but very soon will be available for everyone.
So, how do we use it to publish WordPress plugins on wordpres.org? Or why should we use Github Actions for this?
OK. As you already know, WordPress forces us to use SVN. But if you are like me, you’ll prefer to use Github for Version Control. And using two Version Control systems is not an easy thing because you will have to upload the code from Github to WordPress SVN manually.
Not saying that if your code is compiled using some sort of tools like Webpack, you’ll have to download it on your computer, then compile and later check out the SVN repo and add the new code. Ugh! Not developer-friendly at all.
Let’s start the work.
Change git repo structure:
To make this possible, well change the repository structure a bit. This is my personal choice, but of course, you are free to choose your structure.
src/
assets/
We have 2 folders as follows:
src— This folder will contain all your plugin files.assets— This folder will contain the images used on the wp.org plugin page.
All is good so far.
Add Github Actions configuration:
Create a new file .github/workflows/main.yml. This file will include the rules for our CI. Add the following content:
name: CI

on:
  push:
    tags:
      - "*.*.*"
jobs:
  build:

    runs-on: ubuntu-latest

    steps:
      - uses: actions/checkout@master
      - name: Deploy
        run: chmod +x ./deploy.sh && ./deploy.sh
        env:
          SVN_USERNAME: ${{ secrets.SVN_USERNAME }}
          SVN_PASSWORD: ${{ secrets.SVN_PASSWORD }}
So what does this? First of all, it will be executed only when a new git tag is created. This will usually happen when you create releases, and the nice part is that this is what you’ll use to define the plugin versions.
Next, it will create an environment based on the Ubuntu image(Linux).
Then inside will check out the code and run the scripts from deploy.sh the file. This file does not exist yet, but we’ll create it right away.
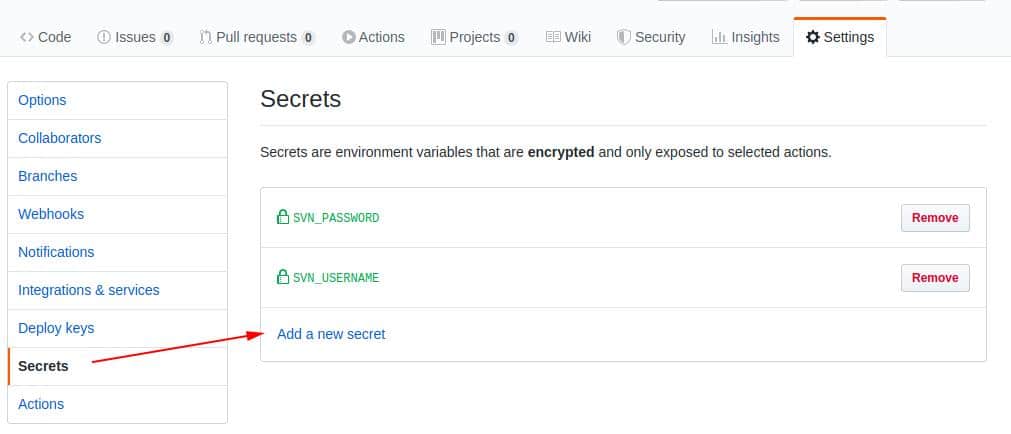
Before switching to deploy.sh, we must set up 2 important environment variables. Your wordpress.org username and password. To do this, open the Settings->Secrets and add your credentials under these 2 secret variables:
SVN_USERNAME
SVN_PASSWORD

It’s all ready. Now let’s add deploy.sh. This file is responsible to upload the plugin code to wp.org.
#!/usr/bin/env bash
# https://zerowp.com/?p=55

# Get the plugin slug from this git repository.
PLUGIN_SLUG="${PWD##*/}"

# Get the current release version
TAG=$(sed -e "s/refs\/tags\///g" <<< $GITHUB_REF)

# Replace the version in these 2 files.
sed -i -e "s/__STABLE_TAG__/$TAG/g" ./src/readme.txt
sed -i -e "s/__STABLE_TAG__/$TAG/g" "./src/$PLUGIN_SLUG.php"

# Get the SVN data from wp.org in a folder named `svn`
svn co --depth immediates "https://plugins.svn.wordpress.org/$PLUGIN_SLUG" ./svn

svn update --set-depth infinity ./svn/trunk
svn update --set-depth infinity ./svn/assets
svn update --set-depth infinity ./svn/tags/$TAG

# Copy files from `src` to `svn/trunk`
cp -R ./src/* ./svn/trunk

# Copy the images from `assets` to `svn/assets`
cp -R ./assets/* ./svn/assets

# 3. Switch to SVN directory
cd ./svn

# Prepare the files for commit in SVN
svn add --force trunk
svn add --force assets

# Create the version tag in svn
svn cp trunk tags/$TAG

# Prepare the tag for commit
svn add --force tags

# Commit files to wordpress.org.
svn ci  --message "Release $TAG" \
        --username $SVN_USERNAME \
        --password $SVN_PASSWORD \
        --non-interactive
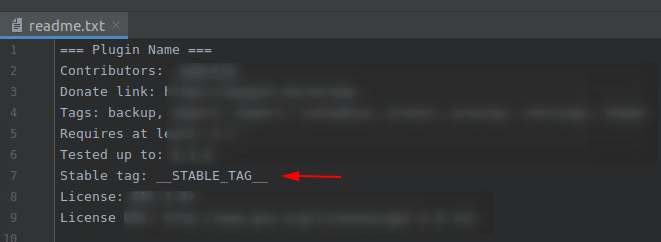
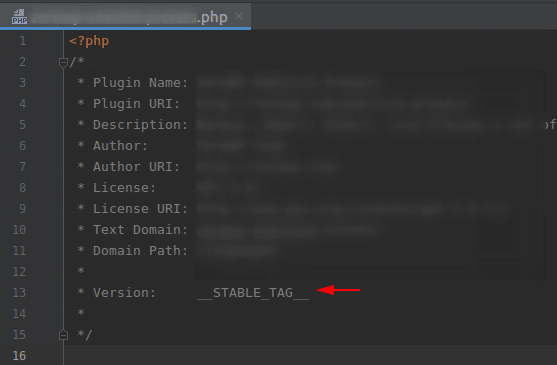
I added comments before each step to make it clear how things are done. But you should notice that there is a replacement involved in. We replace __STABLE_TAG__ with the current release version.
To make this possible, readme.txt and the main plugin file must not define the version but use this string instead. Example:


__STABLE_TAG__ is just an example. You could extend this idea and add the exact version numbers, then replace them with regex, for example:
/Version: \d+\.\d+\.\d+/gNote:
The repository name, wordpress.org slug, and main plugin file must share the same name. Again, you are free to change this in “deploy.sh”.
Example:
GitHub repo: https://github.com/awps/example-plugin/
WP.org repo: https://wordpress.org/plugins/example-plugin/
And the plugin entry file is: ‘src/example-plugin.php’
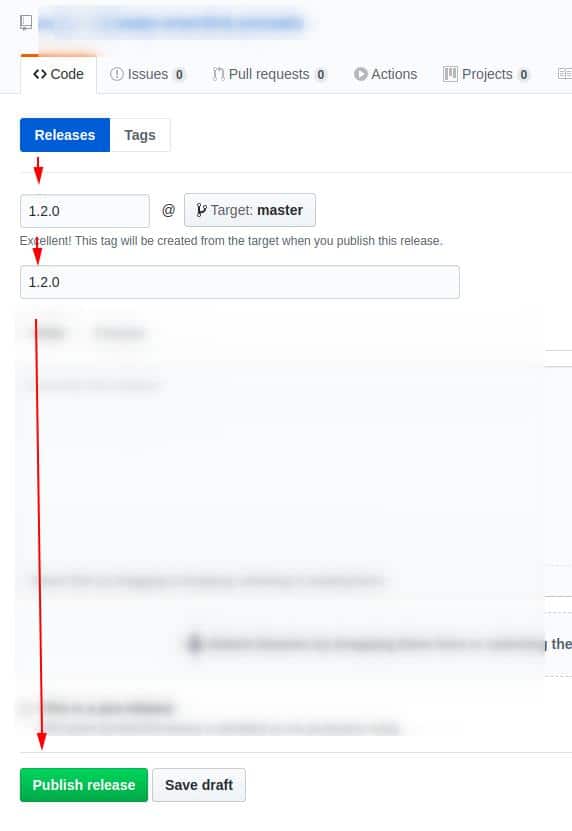
Now you can continue to push the code on GitHub as you usually do and when you feel that you are ready to publish a new release, go to the “Releases” tab and create a new one using the Semantic Versioning rules.

See the following screenshot as an example:

That’s it. Now you can forget about SVN and all that stuff. The Github is all you need 😉
A sample repository is available on GitHub 🙂
https://github.com/awps/sample-plugin


Amazing! I implemented this in some of my plugins and it’s love it. Thank you for providing such educational content.
You’re welcome 🙂
Hi,
Thank you for your guide. My problem is we can’t have plugin file inside /src/ folder. So for development I’d have to resort to a hack and develop plugin then move the files inside a different folder where the repo resides.
Can you write an update to your tutorial that uses .wordpress-org folder inside plugin root, please? Or some other elegant solution that allows me to have the git repo folder inside /wp-content/plugins/ and when i do a tagged release it updates on WP.org repository?
The article serves as a starting point for your setup and is meant to be modified/adjusted to your needs.
If you prefer to have everything in the root, do the following.
Remove `src` from these lines:
Change the following:
to:
So the above command will copy everything from the root, but you may want to copy files and folders selectively. In this case, modify to something like this:
Links are dead 🙁
The links that end with “example-plugin” are not real links. They are part of the article and show you how you must name your project files/dirs.
I verified the other links and they all are fine.